You don't have to calibrate sensors with MIDIsense, it will often work 'out of the box' and most software can set min and max for MIDI input. However, for the best performance, you may find it beneficial: done properly, you can get better precision from the sensor.
You will also need to calibrate the sensor if you are using it to generate Note On/Off & MIDI Start/Stop/Continue as the threshholds for on and off are set this.
To get to the Calibration dialog, click the Calibrate button on the far right on the main window for the sensor you want to calibrate.

This will make the sensor fetch the current calibration values from the board and pop up the dialog

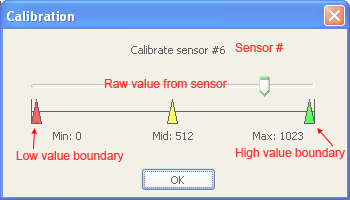
The calibration dialog has a slider with the current sensor data, just like the main window except that this is the raw sensor data straight from the analog/digital converter and uncalibrated. The slider below has three tabs for minimumJanuary 19, 2008 15:49n set the maximum and minimum valid datapoints.
If you drag the minimum higher than the maximum or vice versa, the MIDIsense board will automatically invert the data for you.
For example, say that for a given sensor, the data coming into the board never goes below 25% or above 75%. Uncalibrated, this means that only 1/2 of the MIDI dataspace is being used (values 32 thru 96). By calibrating it so that the max is at 75% and the min is at 25%, the full MIDI data is used (values 0 through 127). Since the sensor has 8 times (3 bits) more data than MIDI can describe, you can 'focus in' on a small part of the sensor data and still get a large spread of data.
This video will show how this works. Off screen, I am moving my hand over the photocell to shade and unshade it.
Press the play button to watch it!
Note On/Off and MIDI Start/Stop/Continue are a little different. The calibration points are used to set the threshholds for when to switch the note on or off. By leaving some space between the two markers, you can add a hysteresis buffer that will keep from triggering notes by accident.
